Basic Phalaenopsis Care Tips
- Orchid Muse
- Apr 22, 2022
- 4 min read
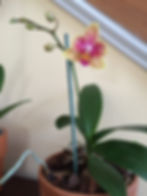
There are five central growing tips I wish I knew when I began growing phalaenopsis orchids (or "moth orchids"). The first two have to do with humidity and light; the other three have to do with orchid roots. Most moth orchids are epiphytes in nature--meaning they live on trees, out of soil. Since they don't like to live in soil like many other houseplants, balancing the right amount of humidity and water for their leaves and roots is the issue that is most difficult to master for the beginning orchid grower. Let's get to it!

TIP #1: KEEP HUMIDITY ABOVE 40%
Being epiphytes, phals need moisture in the air to stay healthy. If you keep them in a spot where the humidity is reliably 40% or above, they will naturally fare better. When I started out, I put my phals on a shaded windowsill in the bathroom. They loved the humidity and the ambient temperature spikes from the shower. These type of moth orchids fare very well in humidity ranges up to 80%, even 90%, if the air around them is moving. But in a normal home environment, if you're not willing to keep a fan going or a breezy window open, humidity at 40-50% will do the trick. I have several inexpensive humidity monitors in various areas of my growing space, which also include handy temperature gauges. (I like the AcuRite 00613 Humidity Monitor--it's inexpensive and very easy to read.)

TIP #2: HAVE THE RIGHT LIGHTING
Phalaenopsis should not be in direct sunlight, nor should they live in a dark corner of your home. Moth orchids generally thrive in 800-1,500 footcandles of light, or 10,000-16,000 lux. There are many ways of measuring and guessing at light levels in your home--some people use the "shadow test" of holding their hand in front of the orchid to see if a blurry shadow is present. (No shadow would indicate not enough light; a sharp shadow would indicate too much light.) I prefer to remove the guesswork and use a light meter. Luckily, there's several free apps for that on your phone. I prefer the Galactica Luxmeter app--it's no-frills and very easy to use.
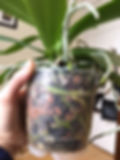
TIP #3: NO WHITE MOLD ON ROOTS OR IN POTTING MEDIA
The orchid in the picture above is a very happy, healthy phal, potted in straight sphagnum moss (it's fairly wet because I just watered it). Do not allow your orchid to grow white mold ("snow mold") on its roots or in its potting media. The mold is a sign that the potting media is broken down, rotting, and probably too acidic for the orchid. Do your best to change the potting media as soon as possible. Soak the pot in lukewarm water to loosen the media, toss the spent media in your compost bin, and repot with fresh media. Remove dead (brown and soft) roots from the orchid, and spray any roots that had the mold on them with hydrogen peroxide before repotting. As a general rule, all orchids should be repotted every one to two years.
TIP #4: LEARN ABOUT POTTING MEDIA, THEN EXPERIMENT
There are two typical media that growers use for phalaenopsis orchids: bark and sphagnum moss, sometimes mixed with chunky perlite. There are any number of other additional types of media used as well (the picture above is a mixture of small bark, hydroton/leca, seramis, and perlite for a mini phalaenopsis). Unfortunately, many bagged "orchid mixes" sold at big box stores are pretty terrible for orchids--the bark is too small and aged. (I've bought many a bag of mix that already had white mold growing on it when I opened it! Totally uncool!) So your best bet is to go to a professional greenhouse and inquire about what they might recommend, buy classic Orchiata bark and/or good quality long-strand sphagnum moss, or a mix from a specialty grower. I always like to support my local businesses first, but when they don't have the things I need, I've used mixes (and fertilizers) from Repotme.com with much success. Like many folks in my local orchid society, after decades of growing orchids, I'm still experimenting with media. Recently, I've taken a shine to high-quality long-fiber sphagnum moss again (see the picture above Tip #3). The key to planting with sphagnum moss is to soak it for half an hour first, then drain it, and pack the pot VERY LOOSELY. Many orchids that you can buy today come in jam-packed pots of sphagnum--this is not good for the orchid, especially in home environments. Packing the sphagnum loosely ensures that enough air is getting to the roots, preventing rot and overcrowding.
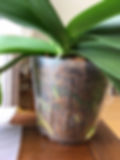
TIP #5: POT SIZE SHOULD BE SMALL FOR THE SIZE OF THE ORCHID
The pictures of the pots for Tips #3 and #4 above--even though they look overcrowded with roots--actually have at least one more year of growth in them. Orchid roots much prefer to be crowded, rather than swimming in a pot that is too large for them. Small pots are better for the orchid's own root moisture management system. Sometimes small pots and large leaves can lead to a top-heavy plant--I address that by placing the orchid's plastic pot inside of a heavier clay or decorative pot. (This also helps to regulate the humidity around the roots.) You should never let an orchid sit in water, and in general phalaenopsis like to be "just dry" before watering them again. Small pots for the orchid's size--even if it means that some of the roots crawl out of the pot--in the end make for happier orchids.
Best of luck with your plant babies! I haven't covered everything with phalaenopsis basics--mostly because everyone's environment is different, so that leads to different needs for your orchids--but I hope this helps address a few of the early tricky issues of growing orchids in your home. If you'd like more general orchid growing tips, please see the appendix in my book Orchid Muse: A History of Obsession in Fifteen Flowers.